How to move your existing wordpress blog to a new hosting provider? This is a common problem faced by many WordPress bloggers. You decide to move your blog to a new hosting provider because of several reasons.
- Low quality service of Your current provider.
- Frequent server outage
- Frequent “Error connecting Database” issues
- Your blog has outgrown your current web host
…and many other reasons.
Recently Globinch.com moved to a new hosting provider. We have completed the transfer to the new hosting provider in just 3 hours. Here is the steps which we followed.
Steps to move your wordpress blog to a new host
Step 1. Identify the new Hosting provider
This depends on many things. What type of hosting you need depends on the popularity, page views and transaction volume of your blog. If you have a high volume traffic site you can think about a dedicated hosting. If the site traffic is comparatively low then a shared hosting is more than enough. Of course almost all good hosting companies gives the option to upgrade at any moment. Most of them claims that the infrastructure is capable of handling sudden spike in traffic even if it is hosted in a shared hosting environment. But depends on the bandwidth usage they may charge you extra.
There are many good hosting companies like Dreamhost, BlueHost, SliceHost, Media Temple and many others. Once you finalized the Hosting provider the buy the hosting plan that suites your need.
Step 2. Back up your blog files and database
This is the most important step you need to do. You need to to take backup of your files and database. There are few things you need to consider when you backup your database. There may be hundreds of spam comments in your database, especially if you use spam blocker programs like Akismet. Delete all those files to reduce the backup file size. Export your database using PhpAdmin or using export commands. This is easy to do. Check the size of your backup. If the file size is more than 20MB then most of the hosting providers will not allow you to import using PHPAdmin interface. You may need to use the command interface using SSH or PUTTY. Try to split the backup by grouping fewer tables together. Make sure that you export the database dump as as SQL (**.sql) file.
Next you need to backup your wordpress files. Using FTP or any FTP tools like FileZilla you can easily download all the files to your machine. Make sure you have backup of “wp-content/themes” and “wp-content/plugins“. These are your blog specific content.
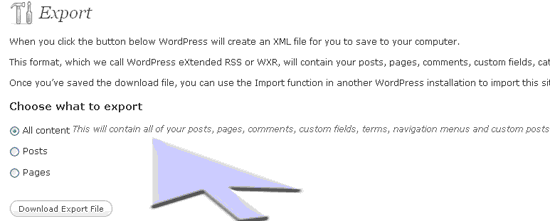
Another easy way to backup your posts and comments is by using the wordpress export feature. Please follow the below steps
- In your old blog, go to Tools and select Export. This will download the XML (WXR) file to your computer. This will import your blog posts , comments etc. see below.

Step 3. Create a database
Now you need to create a database in the new hosting provider. There will be options in the cPanel. Create the database and create database user also. Please note the database name and user credentials. This is required for your wordpress configurations.
Step 4. Import the database dump
Now open the phpAdmin interface and select the newly created database. There will be links to import database from files. Select the backup file and click import. This will create all necessary tables and will insert all the data to the new database.
Step 5. Install wordpress or Copy the wordpress files
Before uploading the wordpress files you need to update the “wp-config.php” with the newly created database name and user credentials. Once this is done you are ready to upload the files.
Now using the FTP tool like FileZilla copy the wordpress files to the root directory( this may “public_html” or “httpdocs” or similar ). Alternatively you can install latest version of wordpress. Most of the hosting providers gives the option to install wordpress with just one click.
If you have used the wordpress export feature then you need to do the following step,
- In your new blog, go to Tools and select Import and then WordPress. Upload the file you downloaded from your old blog.
Step 6. Confirm everything OK
Your hosting provider will usually provide you an option to preview the blog after the wordpress installation. Make sure that you are able to see your home page and other details. If everything in place you can do the next major step.
Step 7. Update your DNS Details or Name Server details
If you have done domain registration with another provider you need to update the DNS entries pointing to your new hosting provider. Usually it will take 24-36 hours to get it reflected across DNS servers. Normally these options will be available in your Domain control panel. If it is not contact your registrar to make the necessary name server changes.
That’s all ! Now sit back and wait for the DNS changes to propagate.
